One-Pan Mongolian Chicken: Juicier, Easier Than Beef!
Imagine a symphony of sweet, savory, and umami flavors dancing on your palate, all brought to life in a single pan. That's the magic of our One-Pan Mongolian Chicken. Forget the hassle of multiple pots and pans, and prepare for a culinary revelation that’s not just quicker and easier than its beef counterpart, but arguably far more succulent and satisfying. This isn't just a recipe; it's your ticket to banishing takeout fatigue and transforming a regular weeknight into an extraordinary dining experience, all from the comfort of your kitchen.
From the moment the chicken hits the hot oil, sizzling to golden perfection, to the final toss in a glossy, rich sauce, you'll understand why this Better Than Takeout Mongolian Chicken: Under 30 Minutes is poised to become your new favorite. It’s designed for convenience without compromising on an explosion of flavor, making it the perfect choice for busy individuals and culinary enthusiasts alike.
Why One-Pan Mongolian Chicken Trumps the Beef Version
While Mongolian Beef has long held the spotlight, it’s time for mongolian chicken to shine, and for good reason. Swapping beef for chicken thighs elevates this classic dish in several crucial ways. First and foremost, we talk about juiciness and tenderness. Chicken thighs, with their inherent fat content and forgiving nature, remain incredibly moist and tender even when cooked quickly over high heat. Unlike beef, which can easily become tough if not cooked perfectly or if the wrong cut is used, chicken thighs are far more reliable in delivering that melt-in-your-mouth texture every single time. This inherent quality makes Sweet, Savory & Versatile Mongolian Chicken Recipe Guide a consistently delightful meal.
Beyond texture, the "one-pan" aspect is a game-changer. The entire cooking process, from searing the chicken to simmering the sauce, happens in a single skillet, drastically reducing cleanup time. This ease of preparation directly translates to more time enjoying your meal and less time scrubbing dishes – a win-win for any home cook. Furthermore, chicken tends to cook faster than beef, especially when sliced into bite-sized pieces, making this an ideal choice for truly busy weeknights where every minute counts.
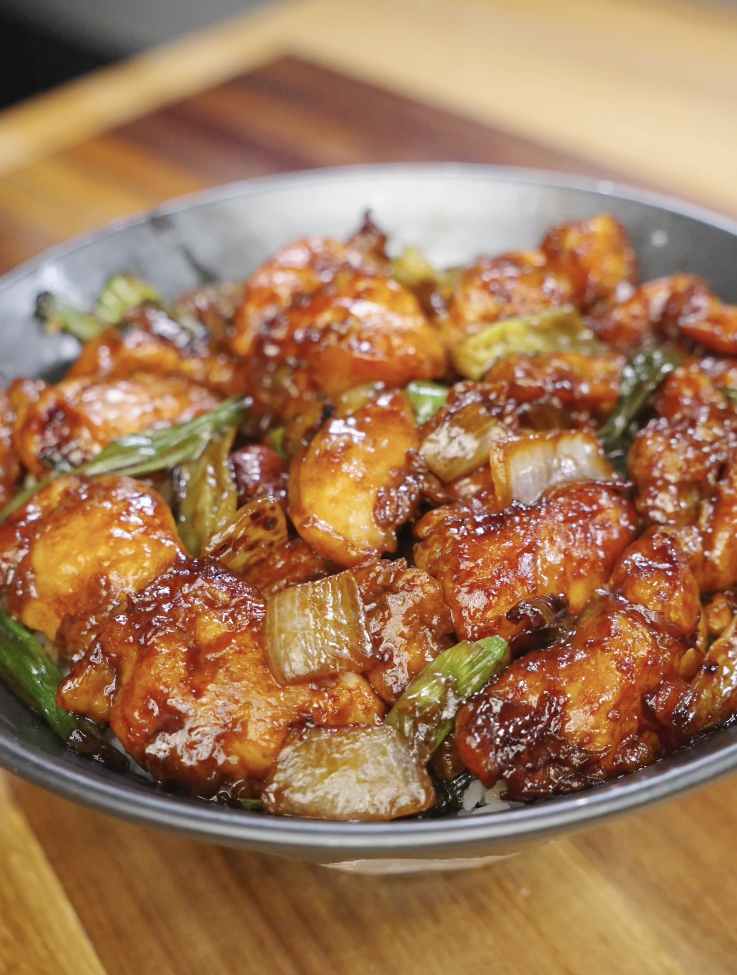
Flavor-wise, this mongolian chicken dish offers a perfect balance. You get the crispy, deeply seared chicken pieces providing textural contrast, enveloped in a harmonious sweet, salty, and umami-rich sauce. The natural bitterness that can come from slightly charred scallions and garlic adds another layer of complexity, preventing the sauce from becoming overly sweet. It’s a dish that caters to a wide array of palates, proving that sometimes, the simpler, more accessible protein can yield the most impressive results.
The Secret to Unforgettable Flavor: Key Ingredients and Their Role
Crafting the perfect mongolian chicken starts with understanding the star players in your ingredient list. Each component serves a vital role, contributing to the dish's signature sweet, savory, and umami profile. Let's break down what makes this recipe truly special:
- Chicken: For ultimate juiciness and flavor, 600g of boneless, skinless chicken thighs are highly recommended. Their higher fat content ensures a moist, tender result that resists drying out. If using chicken breasts, be sure to slice them thinly against the grain to maintain tenderness.
- Brown Sugar (3½ tbsp): This isn't just for sweetness; brown sugar contributes molasses notes that add depth to the sauce and, crucially, helps create that coveted sticky, glossy glaze that coats every piece of chicken.
- Soy Sauce (Light, 2 tsp; Dark, 1½ tbsp): The combination of light and dark soy sauce is key. Light soy provides the primary saltiness, while dark soy sauce, often thicker and less salty, is essential for imparting a beautiful, rich amber color and an incredible depth of umami flavor. For those requiring a gluten-free option, simply swap both for tamari.
- Chicken Stock (¾ cup): This provides the liquid base for the sauce, ensuring it's not overly concentrated. Opting for low-sodium chicken stock gives you greater control over the overall saltiness of the dish, allowing the other flavors to shine.
- Potato Starch (1½ tbsp): This is your secret weapon for perfectly crispy chicken and a velvety-smooth sauce. When applied to the chicken pieces before frying, it creates a light, crisp coating. Later, mixed into a slurry, it thickens the sauce to that ideal glossy consistency. Cornstarch is a perfectly acceptable substitute if potato starch isn't available.
- Neutral Oil (for frying): Vegetable, canola, or peanut oil are excellent choices. Their high smoke points make them ideal for searing the chicken to golden perfection without burning, and their neutral flavor won't interfere with the delicate balance of the sauce.
- Garlic & Ginger: These aromatic powerhouses are non-negotiable. Freshly minced garlic and grated ginger provide the foundational aromatic base, infusing the dish with their pungent, warm, and slightly spicy notes, critical for that authentic Asian-inspired flavor profile.
- Scallions (White and Green parts): The white parts are sautéed with the aromatics, releasing a subtle oniony sweetness, while the vibrant green parts are reserved for garnish, adding a fresh, crisp finish and a pop of color to the final dish.
By understanding and respecting the role of each ingredient, you're not just following a recipe; you're orchestrating a symphony of flavors that culminates in truly outstanding mongolian chicken.
Mastering the One-Pan Method: Step-by-Step for Perfection
The beauty of this mongolian chicken lies in its simplicity and efficiency, thanks to the one-pan approach. Achieving restaurant-quality results at home is entirely within reach by following a few key steps:
- Prepare the Chicken: Begin by cutting your 600g chicken thighs into bite-sized pieces. In a bowl, combine the chicken with a portion of the potato starch (about 1 tbsp), a pinch of salt, and a dash of pepper. This initial coating helps create a crispy exterior and ensures the chicken stays juicy. Let this marinate for about 10-15 minutes while you prepare the sauce ingredients.
- Whisk the Sauce: In a separate bowl, whisk together the chicken stock, light soy sauce, dark soy sauce, and brown sugar until the sugar is fully dissolved. This pre-mixed sauce ensures even distribution of flavor once it's added to the pan. For those seeking gluten-free options, remember to use tamari instead of soy sauce.
- Create the Slurry: To achieve that signature glossy, thick sauce, you'll need a starch slurry. In a small bowl, combine the remaining ½ tbsp of potato starch with a few tablespoons of your prepared sauce. Whisk until smooth, ensuring there are no lumps. Set this aside, as it will be added at the end to thicken the sauce.
- Sear the Chicken: Heat a large, sturdy skillet or wok over medium-high heat with a good amount of neutral oil (enough to coat the bottom generously). Once shimmering, add the chicken pieces in a single layer, being careful not to overcrowd the pan. Overcrowding lowers the pan's temperature, steaming the chicken instead of searing it, which prevents that desirable crispy crust. Cook in batches if necessary, searing until golden brown and cooked through (about 3-4 minutes per side), then remove to a clean plate.
- Sauté Aromatics: In the same pan (add a little more oil if needed), reduce the heat slightly and add the minced garlic, grated ginger, and the white parts of the scallions. Sauté for about 30 seconds to 1 minute, until fragrant. Be careful not to burn the garlic.
- Simmer and Thicken: Pour the prepared sauce into the pan with the aromatics, scraping up any browned bits from the bottom – this is where much of the flavor resides! Bring the sauce to a gentle simmer. Once simmering, give your starch slurry another quick whisk and slowly pour it into the sauce while stirring constantly. Continue to stir until the sauce thickens to a beautiful, glossy consistency that coats the back of a spoon.
- Combine and Serve: Return the seared chicken pieces to the pan, tossing them gently to ensure every piece is thoroughly coated in the luscious mongolian chicken sauce. Cook for another minute or two, just to heat the chicken through and allow it to fully absorb the sauce.
And just like that, you've created a mouthwatering, one-pan masterpiece! The cleanup is minimal, and the flavor is maximal.
Elevate Your Meal: Serving Suggestions & Customization
This mongolian chicken is incredibly versatile, making it easy to adapt to your preferences or what you have on hand. While traditionally served with steamed white rice, there are many ways to elevate and customize your meal:
- Classic Pairing: A bed of fluffy white rice is the quintessential accompaniment, perfect for soaking up every drop of that irresistible sweet and savory sauce. Brown rice or quinoa offer healthier, more fiber-rich alternatives.
- Noodle Nirvana: For a heartier meal, serve your mongolian chicken over stir-fried noodles like lo mein or ramen. The chicken and sauce cling beautifully to the noodles, creating a complete and satisfying dish.
- Light & Fresh: For a low-carb option, turn this into delicious lettuce wraps. Use crisp lettuce cups (like butter lettuce or iceberg) to scoop up the chicken and sauce. You can also serve it alongside cauliflower rice.
- Veggie Boost: Transform it into a full meal by adding your favorite vegetables. Broccoli florets, sliced bell peppers, snow peas, or sliced carrots can be added to the pan after the aromatics and cooked until tender-crisp before the sauce is introduced. Alternatively, steam or stir-fry vegetables separately and toss them in at the very end.
- Protein Swaps: While chicken thighs are highly recommended for their juiciness, this recipe is incredibly adaptable. You can easily swap chicken for shrimp (cook for less time), firm tofu (pressed and pan-fried until golden), or even thinly sliced pork loin.
- Spicy Kick: If you love a little heat, add a pinch of red pepper flakes with the garlic and ginger, or finish with a drizzle of chili oil.
This dish's adaptability makes it a fantastic candidate for meal prep. Cook a larger batch at the beginning of the week, and you'll have delicious, restaurant-quality meals ready to go for days, making healthy eating both convenient and enjoyable. Explore these options and make this fantastic mongolian chicken truly your own!
Our One-Pan Mongolian Chicken isn't just a recipe; it's an invitation to savor the incredible simplicity and profound flavors that home cooking can offer. By embracing the juiciness of chicken, the efficiency of a single pan, and a perfectly balanced sauce, you unlock a dish that effortlessly outshines its takeout counterparts and even rivals the traditional beef version. So, ditch the delivery menus, grab your skillet, and prepare to delight your senses with a meal that promises comfort, convenience, and an unforgettable explosion of taste. This is the mongolian chicken experience you've been waiting for!
